Administration & Workspace Settings
Location: Administration in the left-side navigation.
| 1 |
Plan & Usage Meters # |
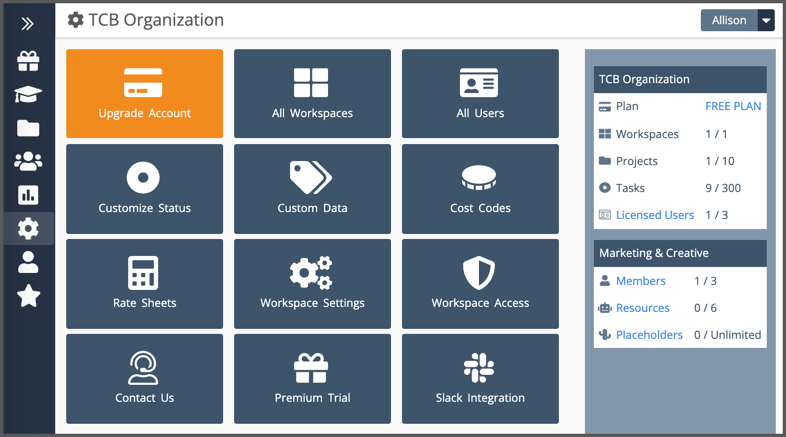
Administration in the left-side navigation is the home for Workspace Settings, customizations, user and plan management. Organization Administrators and Workspace Managers can customize settings.
The bar on the right displays usage meters so you can see how your Organization is tracking against plan and license limits. Jump to those areas using the links.
Use the FREE PLAN to learn about Predictive Scheduling and upgrade to a paid plan when you’re ready for more planning power. Upgrade Account has all the information you need to self-serve. Org Admins can upgrade and manage billing.
Contact a Product Advisor about enterprise trial support and volume pricing for large organizations.
| 2 |
Manage Account # |
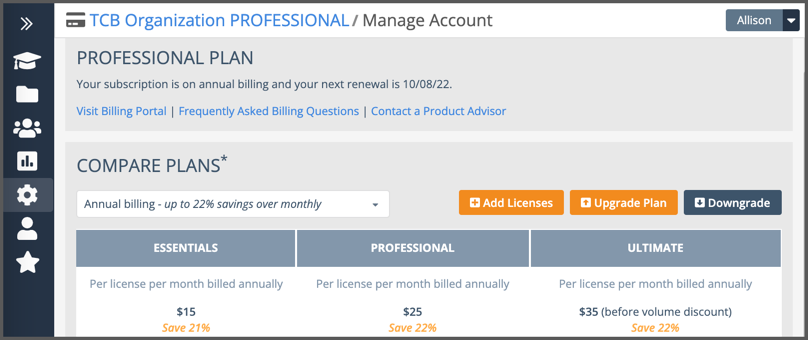
Manage Account is where Org Admins can make changes to your subscription. Use the Downgrade button reduce the number of paid licenses or cancel your subscription. Downgrading and cancellations take place at the end of the current billing cycle. Upgrades go into effect right away.
The Billing FAQ on our website has more on this topic.
| 3 |
All Users # |

All Users lists all the licensed users within your Organization. Organization Administrators are the only people who can access the list and make changes.
Select a user to view their profile. If your Organization has multiple workspaces, you can invite and disconnect users from their user profile page.
Admins are members responsible for user management, billing and plan configuration. They have full access to all workspaces in the Organization.
Disconnected lists former users. Their records are maintained for dashboards and reporting. They can be reactivated on the user profile page. Click on a user to view their user profile.
Pending Invites displays outstanding workspace invitations. Activation links in recent invitations can be invalidated by clicking Revoke. If you need to re-invite someone, just invite them again. Invitations are automatically revoked after 5 days.
| 4 |
Workspace Settings # |
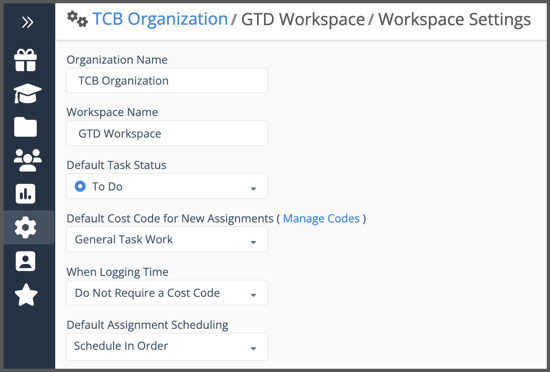
Your first customization occurs when you enter the Organization name during the registration process to start your account. This can be updated at any time by making changes in Workspace Settings.
Organization is your account name. Very often people enter their company name here. Only Organization Administrators can edit this field. Other settings on this page can be updated by either Org Admins or Workspace Managers.
Edit the Workspace Name to reflect your division, department, team or function.
Default Task Status is the status applied when a task is created. “To Do” is a common choice. We start you out with a short status list that you can modify to suit your needs.
Default Cost Code for New Assignments sets the Cost Code that will be applied when new assignments are created. General Task Work is the default Cost Code in a new workspace. It can be changed or set to None.
When Logging Time stipulates whether or not a Cost Code is required when tracking time. When Require a Cost Code is set here members will not be able to log progress without a Cost Code.
Default Assignment Scheduling indicates whether multiple assignments on the same task should be scheduled independently or in order. In Order is the recommended default.
| 5 |
Customizing your Workspace # |

LiquidPlanner has customizable features for communication and tracking to help your team collaborate and get things done.
Customize Status to incorporate your own terminology and workflows into task management. A task’s status communicates the steps people go through to get work done.
Custom Data fields are for tracking, communication, and reporting on unique plan attributes. There are a wide variety of data field types to choose from such as dates, text, URL links, picklists, currency, and checklists.
Cost Codes capture categories of work so you can understand where time goes. They can be specific like, design, coding, testing, or more broad like, project work, meetings, administration.
Rate Sheets establish billing rules that can be used on projects. Once a Rate Sheet is associated with a project, its rules are applied as progress is logged with Billable Cost Codes.
Slack Integration instantly notifies you about task updates so you can take action and keep your project team up to date.
Single Sign-on can be configured by Organizations on the Ultimate Plan.


