Project Templates
Location: Portfolio and Package Views. Click into the Add Project field to reveal the Add Templates button.
| 1 |
Add a Project from a Template in the Portfolio View # |

Project Templates are a great way to add work fast and maintain uniform project structure. This lesson covers adding and setting up projects using a template. Learn about creating and managing templates in the Templates Collection lesson.
To add a project from a template, navigate to the Portfolio view of the collection where you want to add the project. Get to the SCHEDULED collection by clicking Projects in the left side navigation. Access the PENDING and ARCHIVED collections by clicking ALL in the breadcrumb at the top.
There are two ways to access project templates from the Portfolio:
- Enter your cursor into the Add Project field to activate the Add Template button and add projects to the bottom of a Package (pictured above)
- Use the Right-click or 3-dot menu and choose Project Templates to insert projects at a specific location within a Package
To add projects you need Project Manager access or higher either at the workspace level, or on the package where you’re adding the project. Defining access by package or project is available on the ULTIMATE plan.
Select Project Templates

Select the projects you want to add. Choose just one or add multiple projects at a time. Use Go to TEMPLATE Collection if you need edit template details or add tasks. Close returns you to the Portfolio view without adding anything.
| 2 |
Set Project Target Dates, Dependencies, Member Access # |

Once the project is added you can set Target dates and Member Access. Right-click on the project name or use the 3-dot menu to open the Project Edit Panel.
Project Edit Panel

Everything that was set on the template carries over when the project is added to your plan. Because Scheduling and Member Access tabs are disabled in the Templates Collection, you’ll update them after adding the project.
Scheduling: enter Project Target Dates and choose what happens at Finish (keep scheduling or stop scheduling). Set dependencies by clicking on either the Predecessor or Successor link and then choose plan items.
Member Access: workspaces on the ULTIMATE plan can set project access by member or group.
The Changes tab records the last 30 days of task changes on FREE Plans and up to 90 days for paid accounts. Deleted Items are retained for 30 days. Template changes and deleted items are not carried over when the project is added.
| 3 |
Assign and Edit Tasks # |

Click on the project name and jump into Project View to see the task list. Scheduling activates after a project is made from a template. In order for LiquidPlanner to do the calculation, all your tasks need to be assigned and estimated.
If your template is set up with estimated tasks that are unassigned (as shown above), open the Task Edit Panel to assign members and resources on the Assignments tab. Click on a task name to open the panel.
Task Edit Panel

Click on a task name to open the Task Edit Panel. Anything that was set on the template carries over to the task, but you can make changes if needed.
Assignments: assign Members and Resources to calculate the schedule.
Scheduling: with assignments in place you can see the schedule dates, including dates inherited from the Project or Package. If the task needs its own Target Dates, set them using +Target Dates and choose what happens at Finish (keep scheduling or stop scheduling). Dependencies linking items within the template will carry over to the new project.
The Changes tab records the last 30 days of task changes on FREE Plans and up to 90 days for paid accounts. Deleted Items are retained for 30 days. Template changes and deleted items are not carried over when the project is added.
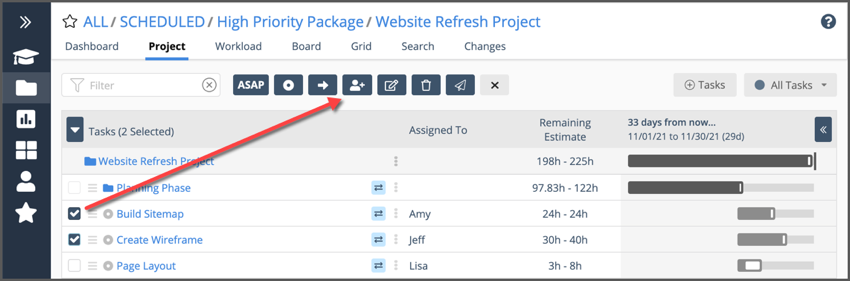
| 4 |
Edit in Bulk and add more Assignments # |
Use the checkboxes on the left to engage the editor as shown above. “Add Assignment” creates a new assignment on the selected tasks. Use the icon next to it on the right to edit Task Name, Description, Task Status, ASAP Scheduling, Target Start, Target Finish, At Finish, Assignment Scheduling and Custom Data Fields. Learn about editing with this feature in the Bulk Edit & Move.


